 Edi
Edi
| Document Version | v.2 |
|---|---|
| Document Last Updated | 07/29/25 |
| Software Version Documented | v.10.0 |
Glossary
Before we get started there are several terms you need to be familiar with regarding EDI and how it works.
-
VAN or Value Added Network - is a third-party private network provider focused on network services including postal functions for EDI transactions. VAN services cover secure emailing, messages encryption, and management reporting, and accepts different communication protocols. These VAN features enable reliable connectivity between organizations, businesses, government or private bodies. Being a convenient and secure way of data sharing and communication, Value Added Networks facilitate Electronic Data Interchange in online business and ecommerce itself.
-
Trading Documents - Savance Enterprise supports the following Trading Document Types
-
Vendors
-
850 - PO
-
855 - PO Acknowledgement
-
810 - Invoice
-
844 - Rebate Claim
-
849 - Rebate Claim Response (Rebate Acknowledgement)
-
820 - Remittance Advice
-
856 - ASN/Ship Notice
-
-
Accounts
-
850 - PO
-
855 - PO Acknowledgement
-
810 - Invoice
-
812 - Credit Memo
-
-
EDI Workflow
Below is a visual representation of how the EDI workflow functions:
Vendors:

Accounts:

Setting Up EDI
Getting Started
The goal of this section is to outline the process of successfully setting up, and testing with an EDI trading partner.
-
Using your Email
- Create a new folder in your email provider, i.e Outlook, Gmail etc, and name it ‘Your Company Name | EDI Testing’. This step will help you stay organized when communicating with all your trading partners. You’ll also use this same name in your email subject line to your partners.
-
Initial Contact
- Before anything can get started you will need to reach out to your EDI trading partners explaining you are moving to a new system and or would like to start using EDI with them. At this time you will also verify what documents they trade, verify their settings, and inform them you would like to perform some testing to ensure there’s no interruption/errors with this service. NOTE: This step can take the longest and you’ll need to be consistent in following up to get the information you are looking for.
-
All Information Collected/Verified
- Once the necessary information has been verified and collected we can begin EDI set-up within the Savance Enterprise software.
Setting up EDI Sites (Conduit)
-
In your top menu go to Admin>EDI Manager, select ‘Settings’, and you will appear on the Home EDI Settings page.

-
Select ‘Sites’ from the menu.
-
On the EDI Sites page, you will enter your specific EDI settings. NOTE: If using EDI you will have at least one setup.
-
Select ‘Add’
-
Enter EDI SITE Site Name.

-
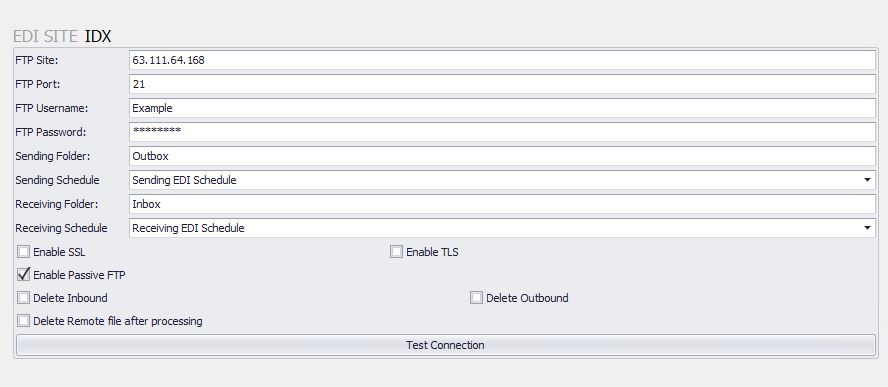
FTP Site - Address of your EDI processor.
-
FTP Port - Port used for your EDI processor.
-
FTP Username - User name of your EDI processor.
-
FTP Password - Password of your EDI processor.
-
Sending Folder - Folder where documents to be sent are queued at the VAN
-
Sending Schedule - Schedule to send documents. Default is every 15 minutes
-
Receiving Folder - Folder where documents to be received are queued at the VAN
-
Receiving Schedule - Schedule to receive documents. Default is every 15 minutes
-
Enable SSL - Check this if your EDI processor uses SSL. This will depend on the VAN requirements.
-
Enable TLS - Check this if your EDI processor uses TLS. This will depend on the VAN requirements.
-
Enable Passive FTP - Used with FTP servers that only support Passive FTP mode and you can't connect using Active FTP.
-
Delete Inbound - When downloading files coming from the FTP server, do we want to keep it after processing or delete it. The deletion will happen only if the processing goes without errors.
-
Delete Outbound - When we generate an EDI file and send it to the FTP. Checking these options will delete it from our local box after sending it to the server.
-
Delete Remote file after processing - This option deletes the remote file after it processes it. Use this so the server cleans up processed documents.
-
Enable - Enables the site.
-
Test Mode - Puts the site in test mode (Make sure to be careful using this setting as to not send valid POs, Invoices, etc.)
-
FTP Server Type - FTP (Standard FTP)
-
SFTP (Secure FTP)
- FTP Auth Type - Anonymous
Basic
Private Key
-
Segment Terminator - These are the special characters appearing at the end of a segment to indicate the termination of the segment (e.g., N/L). Sometimes, you can not see them, for example, the carriage return line feed like in the example above is not visible to the human eye, but it does exist. See ~ in example in Element Terminator.
-
Element Terminator - The data element delimiter is a special character that separates the data elements.
ST*850*23588~BEG*00*NE*19037098**20051101
In this case, the element delimiter is an asterisk character.
- Composite Terminator - Are a set of sub-elements that represent a single named item. Thinking of them as a set of child elements of a regular data element can be helpful. For example the REF segment three regular elements and one composite element:
REF01 – Ref ID qualifier (element ID 128)
REF02 – Ref ID (element ID 127)
REF03 – Description (element ID 352)
REF04 – Ref ID (element ID C040)
The regular element separator separates REF01, REF02, REF03 and REF04, and the sub-element separator separates the sub-elements in REF04. If the element separator is “*”, the sub-element separator is “>” (according to ISA-16), and segment the Terminator is “~”, the REF segment can look like this:
REF*PK*1234**BM>4321~
-
ISA ID Qualifier - Interchange ID Qualifier, it is to specify the type of the ISA ID (DUNS, telephone number, etc). This is typically a two-digit number.
-
ISA Sender ID - Interchange Sender ID. This is an identifier to the trading partner.
-
GS Sender ID - This is also an identifier for the partner but it is per function. This ID is typically the same as the ISA Sender ID.
-
When completed select ‘Save’. Below is an example of a completed configuration EDI Site for IDX:

Vendors
-
From the top menu select ‘Vendors’. These settings will be used to set up each Vendor that utilizes EDI.

-
Template - If you have a saved template you can select it from here.
-
Conduit - EDI processor setup in sites to use. (EDI Site)
-
ISA ID - Interchange Sender ID. This is an identifier to the trading partner.
-
GS ID - This is also an identifier for the partner but it is per function. This ID is typically the same as the ISA Sender ID.
-
ISA ID Qualifier - Interchange ID Qualifier, it is to specify the type of the ISA ID (DUNS, telephone number, etc). This is typically a two-digit number.
-
Test ISA ID - Test Interchange Sender ID. This is an identifier to the trading partner.
-
Test GS ID - This is also a test identifier for the partner but it is per function. It can be the same or different then the ISA Sender ID.
-
Send 997 Confirmation - 997 Functional Acknowledgement is returned for each batch transaction received. This file acknowledges the receipt of the file and reports any data compliance issues.
-
EDI Test Mode - Puts this Vendor in test mode
-
Trading Documents - Refer to the Trading Documents section.
-
Document Segments - We provide several optional segments sent inside the EDI document. For example, address formats, PartNumber format, UPC format, etc. When you move the segment from the left panel to the right panel, this means to include this EDI segment in the issued EDI documents (It works for inbound as well, for example how to parse an incoming PartNumber, UPC, or address, etc.).
-
-
When completed select ‘Save’. If you have more than one Vendor that supports EDI you will repeat this process until all your Vendors are set up.

Accounts
-
From the top menu select ‘Accounts’. These settings will be used to set up each Account that utilizes EDI.
-
Select the + Add button.
-
Choose your Account and enter the following information.

-
Template - If you have a saved template you can select it from here.
-
Conduit - EDI processor setup in sites to use. (EDI Site)
-
ISA ID - Interchange Sender ID. This is an identifier to the trading partner.
-
GS ID - This is also an identifier for the partner but it is per function. This ID is typically the same as the ISA Sender ID.
-
ISA ID Qualifier - Interchange ID Qualifier, it is to specify the type of the ISA ID (DUNS, telephone number, etc). This is typically a two-digit number.
-
Test ISA ID - Test Interchange Sender ID. This is an identifier to the trading partner. It is
-
Test GS ID - This is also a test identifier for the partner but it is per function. It can be the same or different than the ISA Sender ID.
-
Send 997 Confirmation - 997 Functional Acknowledgement is returned for each batch transaction received. This file acknowledges the receipt of the file and reports any data compliance issues.
-
Send 855 for All Orders - Purchase Order Acknowledgment (Imports)
-
EDI Test Mode - Puts this account into test mode.
-
Trading Documents - Refer to the Trading Documents section.
-
Document Segments - We provide several optional segments sent inside the EDI document. For example, address formats, PartNumber format, UPC format, etc. When you move the segment from the left panel to the right panel, this means to include this EDI segment in the issued EDI documents (It works for inbound as well, for example how to parse an incoming PartNumber, UPC, or address, etc.).
-
-
When completed select ‘Save’. If you have more than one Accounts that supports EDI you will repeat this process until all your Accounts are set up.

Managing Vendor & Customer Account Defaults
Once you have finished working within the EDI Manager you can now set the preferred defaults at the Vendor and or Account level.
Vendor Level Defaults
-
From your top menu go to Purchasing > Manager Vendors
-
Search and select a Vendor that has been previously set up in the EDI manager.
-
Go to the ‘Delivery Methods’ tab
-
Choose your Conduit
-
Enter your:
-
Qualifier
-
ISA ID
-
GS ID
-
Test ISA ID
-
Test GS ID
-
-
Select if you want to receive 997 Acknowledgements
-
If you are in Test Mode, make sure that box is checked.
-
-
Next under each Document Type select if you want the default to be set to EDI then choose a backup delivery method for that document in case EDI fails. NOTE: when you convert a PO you will get a prompt for these settings as well, in case you wish to override it.

-
Once you are complete, select ‘Save’ to update your changes.
Account Level Defaults
-
From your top menu go to Accounts > Manage Accounts
-
Search and select the Account that has been previously set up in the EDI manager.
-
Go to the ‘Delivery Methods’ tab
-
Choose your Conduit
-
Enter your:
-
Qualifier
-
ISA ID
-
GS ID
-
Test ISA ID
-
Test GS ID
-
-
Select if you want to receive 997 Acknowledgements
-
If you are in Test Mode, make sure that box is checked.
-
-
Next under each Document Type select if you want the default to be set to EDI then choose a backup delivery method for that document in case EDI fails. NOTE: when you convert a SO you will get a prompt for these settings as well, in case you wish to override it.

Admin Settings
-
In your top menu go to Admin>Administrator, choose the ‘Warehouses’ tab.
-
Within the Warehouse Info tab, there are two fields to focus on.
-
EDI Email To Name
-
EDI Email Address
- This email and name will be the contact information if there are any EDI failures, successes and or updates.

-
-
Once completed select ‘Save’ to update your changes.
Warehouse Settings
-
Next, under the ‘Warehouse’ tab, you will now select the ‘Warehouse Settings’ tab.

-
From here you will select what EDI statuses you want notification on. By default, we’ve selected ‘Send EDI Failures’, but you can also choose ‘EDI Success’ and 'EDI Updates’ as well.
-
Once you’ve made your choices on notifications select ‘Save’ to update your changes.
Purchasing
-
Next, under the ‘Warehouse’ tab, you will now select the ‘Purchasing’ tab.
-
Under the ‘Default Shipvia’ field select ‘Best Way’ from drop-down menu

-
This setting triggers the shipping method that will appear on your PO/SO’s automatically.
Delivery Methods - EDI
-
Next, under the ‘Warehouse’ tab, you will now select the ‘Delivery Methods’ tab.
-
Here you will enter the email address From Name, From Email, and Reply Email for the EDI row.
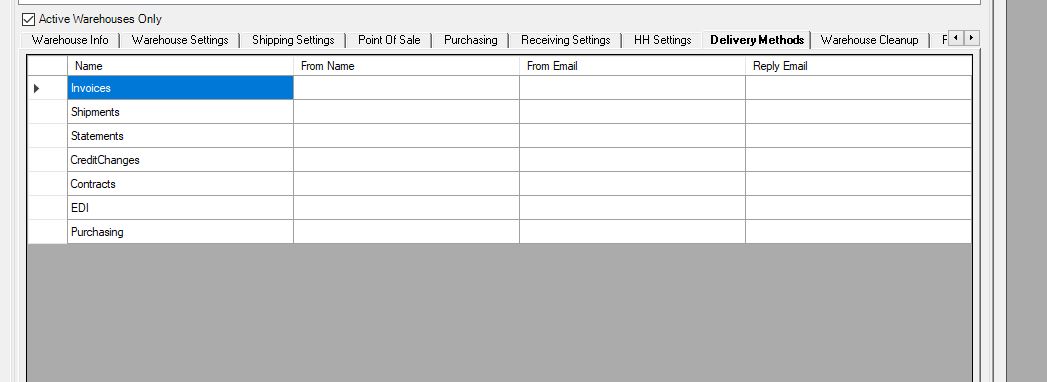
- NOTE: If you have multiple locations repeat for each location.
General Settings
-
In your top menu go to Settings>General, choose the ‘General’ tab.
-
Select the ‘User’ inner tab
-
Select the ‘UserSettings’ tab
-
Ensure that the ‘Prompt for Vendor Delivery Methods’ box is checked.

-
This triggers at a SO or PO conversion if you want to send it by EDI or override to email, print, etc.
Testing EDI
Now that you have completed your EDI setup it is now ready to test with your trading partners.
Vendor Communication Testing
-
Your EDI contact should be aware you are testing, and your settings within the EDI Manager for this Vendor should be marked as ‘Test Mode’
-
When communicating with your EDI contact for your Vendor, verify the segments in your set up with them to ensure they are receiving the correct information they need to process your documents.

-
Next Create a PO and enter Test EDI as the PO# for reference.
-
Convert the PO
-
The PO should create an outbound file (850 PO), and once dispatched it will be sent to the VAN/FTP based on the Vendor Account settings.
- If this runs successfully we will automatically receive an inbound functional acknowledgment (997)
-
After the transmission is completed and successful, you should receive an inbound PO acknowledgment (855 PO ACK)
- If this runs successfully we will automatically send an outbound functional acknowledgment (997)
-
Upon order completion you will receive an inbound Invoice (810) for you to process in the platform.
-
By default your Scheduled Outbox and Inbox will send and receive every 15 minutes.
In the event there are issues in connectivity or the mapping is not correct, as long as your settings within your Admin settings are set for ‘Send EDI Failures’ you will get a notification. NOTE: If you and your Vendor EDI contact believe there should be no reason why you both aren’t receiving communications you may need to engage your VAN specialist to get any issues resolved.
Account Communication Testing
-
Your EDI contact should be aware you are testing, and your settings within the EDI Manager for this Account should be marked as ‘Test Mode’
-
When communicating with your EDI contact for your Account, verify the segments in your set up with them to ensure they are receiving the correct information they need to process your documents.

-
Next Create a SO and enter Test EDI as the PO# for reference.
-
Convert the SO
-
The SO should create an outbound file (855 PO ACK), and once dispatched it will be sent to the VAN/FTP based on the Account settings.
- If this runs successfully we will automatically receive an inbound functional acknowledgment (997)
-
After the transmission is completed and successful, you should receive an inbound PO (850 PO)
- If this runs successfully we will automatically send an outbound functional acknowledgment (997)
-
Upon order completion you will receive an inbound Invoice (810) for you to process in the platform.
-
By default your Scheduled Outbox and Inbox will send and receive every 15 minutes.
In the event there are issues in connectivity or the mapping is not correct, as long as your settings within your Admin settings are set for ‘Send EDI Failures’ you will get a notification. NOTE: If you and your EDI contact believes there should be no reason why you both aren’t receiving communications you may need to engage your VAN specialist to get any issues resolved.
Reviewing your EDI transactions
To review your transactions (EDI documents)
-
Go to Admin>EDI Manager to view your menu items.
-
Select ‘Transactions’
-
Choose your proper filters to view all EDI transactions, you can filter by:
-
Date From, and Date To
-
Partner Name
-
Reference Number
-
Transaction Direction
-
Transaction Status
-
ISA Control Number
-
GS Control Number
-
ST Control Number
-
ISA ID

-
-
Select the Partner and expand the menu to see all ‘transactions’ for that partner.
-
Using Color for Status here is the legend for the following
-
Red>Error
-
Green>Successful
-
Yellow>Not Processed Yet
-
Gray>Cancelled.
-
-
To drill down on any transactions select the + to expand the listing.

-
View the error message.
-
Contact your EDI contact and see how they would like you to proceed.
Another way to view and resolve you EDI transactions
-
Go to Admin>EDI Manager to view your menu items.
-
Select ‘EDI Actions’
-
In your EDI Action Center you can select ‘Purchasing’ or ‘Ordering’ to view:
-
Next select the document Type you want to review i.e 850 PO’s
-
In the next screen you can filter by the following issues:
-
All Transmissions
-
Deferred
-
Unresolved
-
Resolved

-
-
View the message for more information.
-
For any Unresolved issues select a Link to view the details

-
The message above is from your Vendor and or Account. Using the Color Legend you can see what has been changed, rejected, backorder, etc.
-
If you need to make any updates to your PO/SO i.e. price changes you will need to Unlock the original PO and update accordingly. Once the PO/SO has been updated select ‘Save’.
-
Once the updates on the PO/SO are complete you’ll need to resolve, or ignore each line.
-
If you have resolved all the items on the 855 PO ACK, the status will now change from Unresolved to Resolved. Your EDI transaction is all set and no further action is needed.

When testing has been completed and successful you will leave everything in Test-Mode until Go-Live. During the Go-Live transition you will need to remove all Vendors & Accounts from “Test Mode” within the EDI Manager and at the account level. This concludes the EDI configure, setup and testing process for Savance Enterprise. Reviewing the EDI Sidebar
Managing and tracking POs sent out through EDI with the ability to see all transactions related to the line item and scroll through the order lines to view each EDI transaction then View more info in the EDI Viewer
-
Given that EDI is used to send out POs to be fulfilled
-
There is at least one 850 showing that it was sent out
-
Open the PO and open the EDI Info section of the side bar
-
By default the first line of the PO is selected
-
And it shows the 850 PO Sent info
-
850 - Date/Time Transacted
-
PO Number
-
Release
-
PO Date
-
Shipment Method of Payment
-
Location Qualifier
-
FOB
-
Routing
-

-
Click on the View button to see the EDI Viewer for more information
-
Expand the Transaction to See Summary, Billto, Shipto, Line Item information

-
Once the PO has been acknowledged through EDI
-
View the latest acknowledgement to see the 855 for that line

-
Then once the item is shipped
-
I can scroll even further to see the 856 transaction and it’s info
-
If there is more than one of the same type of transaction for the selected line item
- For example, more than one 856
-
They will be listed, separated by their date and time stamp as they are different transactions
-
As I click through each line item, different EDI information can appear if the lines are shipped separately
-
And I only have to scroll to see all related EDI transactions
-
The header text for each transaction will show the EDI Transaction Type and its date/time stamp
-
850 - (PO Sent)
-
855 - (PO Acknowledgement)
-
856 - (Ship Notice)
-